I don’t know about you, but I am one of those people that use online shopping carts as wishlists, I’ll always add a ton of stuff and then never check out. Until recently, I’ve had shopping carts full of makeup and skincare on Revolution Beauty, Superdrug, and Beauty Bay – but last week I purchased the content of my Revolution cart. The reason why? They put up a post on Instagram advertising free goodie bags of stuff worth £25 for purchases over £30!
Now, I’m not stupid. I know shops use goodie bags and “free X if you buy Y” as a way to get rid of stuff that doesn’t sell well, that is going out of stock, or that will expire soon if not purchased. So my expectations weren’t high. However, I’ve yet to be disappointed with anything from Revolution, and as I was buying stuff I wanted to test anyway, as opposed to products I already know and love, I figured why not. This is an opportunity for me to test some new things and get some free makeup and who doesn’t like free makeup?
The Stuff I Ordered
I placed my order and it arrived a day or two later. This was in the middle of my beta test of Anno 1800 (read about that in my previous entry here), so it took a few days before I took the time to test everything. So without any further ado, let me show you what I ordered and what I got for free (I did already post about this on Instagram but that was before testing everything):

My order consisted of 6 things: the conceal and define foundation, the PRO foundation drops, their new cut crease canvas which is a full coverage eyeshadow base, liquid eyeliners in black and white, and the Reloaded Marvellous Mattes eyeshadow palette.
I got the two foundations because they seem quite popular, and my current foundation isn’t working so well with my skin at the moment (and I want to stop supporting brands that test on animals). I’ve watched a lot of people with different skin types on youtube using the different foundations to get their opinions, and I just decided to get both and test them out.
I actually really enjoyed both of these foundations, they both went on my face very well, I’d picked good shades for me (F2, for fair skin with yellow undertones), and they didn’t feel cakey or disappear on my skin which some foundations have done in the past. The application was new for me with both of them, as the drops are obviously in a dropper and that’s how you put them on your face, while the conceal and define has a doe foot applicator, which I’m used to with concealers and liquid lipsticks, but have never tried with a foundation before. I’m used to pumps and squeezy tubes! I found them both to go on my skin nicely and blend out well with a wet sponge (I currently have the Real Techniques miracle complexion sponge), and they definitely both gave me coverage, smoothed out my skin nicely, and looked and felt nice on my face.
I got the black eyeliner because I’m not too big a fan of felt tip pen eyeliners, they dry out too fast, and I used to love a dip eyeliner from Loreal that I had before, except that the tip isn’t very skinny so it’s hard to get a precise line (and Loreal isn’t cruelty free). I found this one a bit hard to use to fill in, but it does draw really sharp lines! And I got the white one because I thought I could use it in artistic ways, or something.
I got the cut crease canvas in white because if I want a more skin colour cut crease I’ll just use concealer (I currently have 3 of the conceal and define concealers so I won’t run out anytime soon). I thought this could be wonderful to use to make those colourful colours really pop and appear true to colour! It’s an old trick, to cover your eyelids in white primer or even smudge white pencil liner all over your lid to make the colours appear more vibrant!
And lastly, I currently don’t have any singles or palettes with these kinds of bright and colourful colours, which is why I got the new Reloaded Marvellous Mattes eyeshadow palette. I have palettes with yellow and orange, I have some reds, I have some pinks and purple tones, and I have palettes with black and white shadows in them, but what I don’t have at all at the moment is any bright green (the ones I have are more olive toned or sparkly), or any blue shades like the two in this palette (fun fact, the darkest blue is an exact match to my iris). I also don’t think I have a hot pink, and I know I don’t have a bright purple like this one. And it was only £4 for 15 shades, so I thought it was a bargain. I did swatches of all the eyeshadows, but I haven’t been able to test them all on my eyes yet. Anyway, here is a closeup of the palette and the swatches:

I rubbed my finger back and forth twice, so four times across each shadow, and I went over each swatch twice. They feel nice, perhaps a bit powdery, but they’re quite pigmented, and I’d say they’re buildable as well which is good. I don’t mind spending a little bit of time building up a shadow. From the shades I’ve tried, I found that they lasted several hours without any creasing or smudging, which is what I’ve come to expect from Revolution eyeshadows. And I can definitely see myself using these shadows a lot!

The Stuff That Arrived
So that was all the makeup I purchased. Now let me show you everything that actually arrived, including the goodie bag:
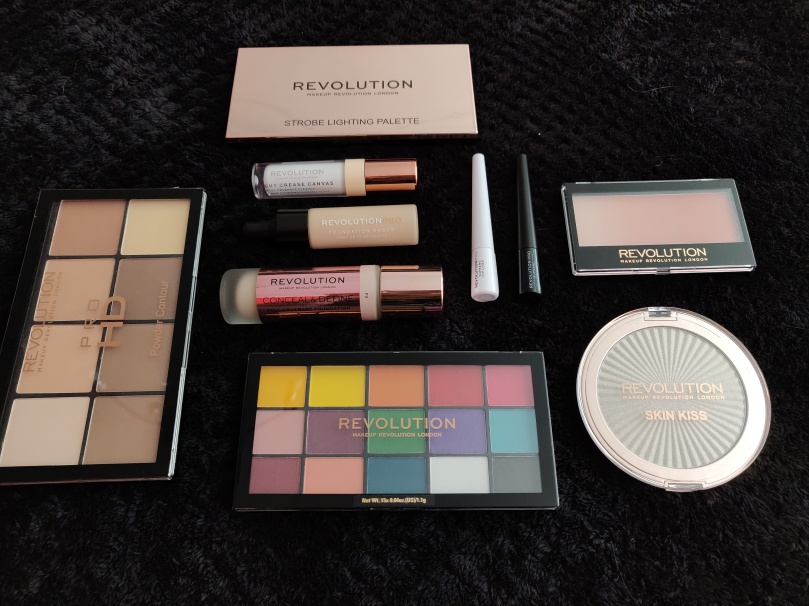
So I got four products for free. Two palettes, and two singles. One highlight/contour/bronzer palette, one highlighter palette, a single highlighter, and a single gradient highlighter. A lot of highlighters! My initial thought when unwrapping everything was “I’m never gonna have to buy highlighters again if these are good!”
I wasn’t disappointed with any of these products, there wasn’t any that I saw and thought “oh no not this” because I can honestly say I’ve never really noticed these products in shops before (and Revolution is always the first brand I go to whenever I’m in Superdrug). It was quite nice to receive a powder contour kit, it’s something I’d not usually buy, and I’m definitely happy it was powder and not cream. I got the shade light/medium, which is their medium shade; they have one for fair which is lighter and one for medium/dark skin tones which is darker. I’m definitely more on the fair side, but I think I can use all of these shades regardless. Here’s a closeup of the palette:

The top left shade is a nice colour for under eye brightening and other highlight spots – it’s matte so it can be used as a setting powder too actually. The other shades on the top row are quite warm toned so they’re nice for bronzing. They’re all matte too but will add some colour. I’d definitely use more warm tones on my forehead for example, where the sun hits more naturally.
Along the bottom row, the three brown shades are more cool toned, so I’d use those to contour my cheekbones and jaw line, and if I ever get the hang of nose contour too, I think. The 3rd shade on this row is quite dark – but I can actually use that for my eyebrows if I want to! The 4th shade is another highlighter shade, more like a banana powder in my opinion, and I might be able to use this somehow.

The other palette I got was a highlighter palette called the Strobe Lighting palette, and it contains three shades. To the eye they look white, gold, and pink. All three are light enough in colour for me, which is always my biggest concern with highlighting palettes – there are always shades that are just too dark for me, but in this one that’s not the case. This palette also came with a mirror!
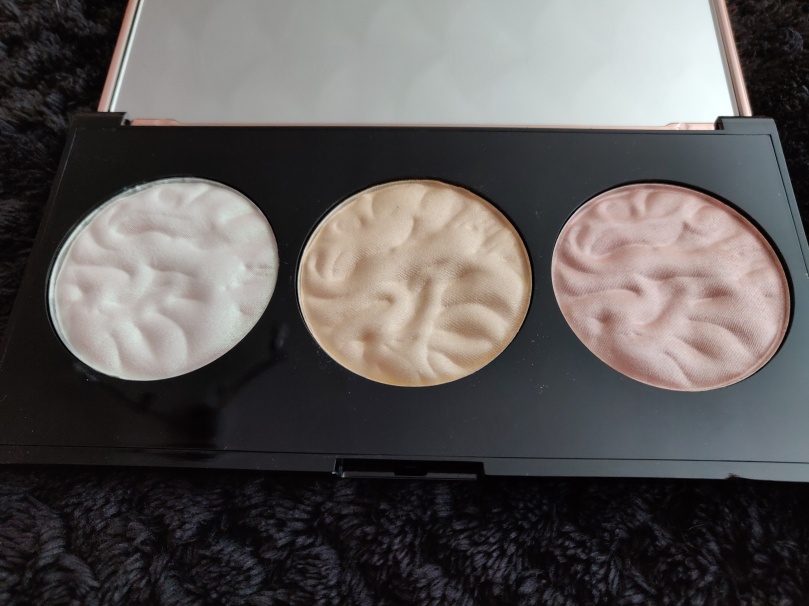
I’m not gonna lie, I had some trouble swatching these shades, specifically in that they did not appear on my skin at all. I struggled to see them with my eye, and I struggled to get them to appear on camera. To show you, I tried multiple different angles, and methods of swatching. Here are some swirls on my dry skin of all three in order, if you can see them. The white shade, which is more of a duochrome shade with green in it, shows up alright, but the gold and the pink are barely visible at all…


I then decided to try and swatch them on wet skin, as that’s a trick many use to get highlighters to show up more. At least now I could see them all on my arm…

If you’re curious, this is what they look like just on my fingers, before swatching. They look a bit dry and powdery to me, but when I drag then down my arm, they definitely look a lot smoother, and not chalky at all. But the white is definitely the most vibrant of these three highlighter shades.


I did also look up one of my favourite youtubers, Sophdoesnails, and she spoke about this palette in this video (at 5:28 if my time stamp doesn’t work). She also said that the duochrome white-green shade is more pigmented while the gold and pink are more subtle, so at least I know now that it’s not just my swatches that are messed up, this is how the palette is made. I did use them all on my skin, but I like a more blinding highlight sometimes and had to use the white over the gold to get the result I wanted, but if you like a more subtle look and gold and pink tones, you’ll probably like this a lot!
The third free product was a large single highlighter, the Skin Kiss highlighter in the shade Ice Kiss. Up close it looks like this:

This is one of the three original Skin Kiss highlighters from Revolution, and it’s described as a white with a hint of gold to it. Soph also made a video about these highlighters, which you can watch here if you’re interested. Personally I’m a bigger fan of a straight up white highlighter or more silver toned than gold toned, like the Limited Edition one from the Imogenation Highlight to the Moon palette with Revolution, so if I were to pick a Skin Kiss I probably would have gone with something more like Frozen Kiss over Ice Kiss, but I can make this work too, it will make me glow! Or sparkle…
I swatched this highlighter both wet and dry as well. Dry, it is quite chunky, a bit powdery and chalky. No joke, when I turned my hand to do the wet swatch, powder fell into my lap from the swatch. Granted, I did kind of pack it on here, but still, it was chalky in the pan too and people have commented this in reviews on the Revolution website. Wet, it looks a lot smoother in my opinion, and the gold comes out more as well.


Others have also said it’s quite glittery, which I can see when Soph applies it to her face in the video as well, so some of you might not like that. When dragging my fingers down my arm instead of swirling around on my hand, this is what the dry highlighter looks like:

I think a little goes a long way, and with how huge this pan is, if this is the kind of highlighter you’re looking for, I think it would last you ages!
The last free product was this gradient peachy toned highlighter, the Revolution Gradient Highlighter Sunlight Mood Lights, and up close it looks like this:

This was probably the product I was more unsure of if and how I would use. When looking at it, it doesn’t look like it’s all that glowy or highlightery, it almost looks more like a blush with a little bit of shimmer in it. Hell, I’ve seen blushes with more shimmer to it than this highlighter has! I can use the lightest part as cheekbone highlight if I want to, for a more natural glow, but the darkest part is definitely too dark for that. What I’m thinking is that the darker part might look quite nice as a blush especially when we get closer to summer and I’ll want more glow to my skin than I do right now (too much shimmer everywhere just makes me look oily/sweaty). Here are some swatches from different parts of the pan, as you can see, it’s a very natural glow, not in-your-face at all.


Believe it or not, that darker shade is from the middle, while the one below is actually from the darkest side of the pan! I definitely think this might be more of a blush-highlight combo for summer if I manage to get a bit of a tan or something, rather than a highlight for me, especially now during winter where my skin is white borderline blue… But it could look really pretty with a nice base and just some eyebrow pencil and mascara for a fresh summery look, don’t you think?
Did the Free Stuff Actually Add Up?
Now, the Instagram post from Revolution said the value of the goodie bag would be £25. So was it really? I went on their website to see if I really got free makeup worth almost as much as my original order and the short answer is yes. When everything is full price, the items add up to £25 exactly, with two products costing £8, one costing £4, and one costing £5:


However, I also discovered something when I was browsing the website searching for the products. Each of the products I received was the only one in its category that wasn’t currently on sale! I took some screenshots to show you:

The Powder Contour: I got the palette in light medium, which is £8, but the fair and medium dark palettes are currently on sale for only £2.40 each, which is70% off. I thought it could be a coincidence but it continues:

There are two gradient highlighters, the sunlight one I got which costs £4, and the peach one which is on sale for £1.20. That one is also 70% off at the moment.
And as if that’s not enough:


ALL of the skin kiss shades EXCEPT for Ice Kiss which is the one I got, are on sale, £2.50 instead of £5, which is 50% off (and a bargain for how much product you get in one pan, just saying – if this is your thing go grab some!).
This COULD all be a coincidence, but it doesn’t really feel like it, when EVERY product in each category is on sale EXCEPT for the ones that were in the goodie bag I got. I’m not complaining, I got free stuff, but still… Are they not on sale because they’re in the goodie bags? Do they want people to buy all the other items that are on sale and receive the items that aren’t in the goodie bags? Or is it simply for people like me who wanted to check if the price of the free items added up, so that we can’t complain we didn’t get the full £25 value that was promised? What do you think?
Have you ever purchased items simply to get free stuff with it? If so, what did you think of the free stuff? Let’s talk in the comment section!
xoxo
Julie

